
In the world of mass production, a thing in which the soul is invested is so appreciated. And what can be more soulful than warm, soft light filtered through paper that you have turned into an art object with your own hands? ✨
In 2026, the trend for man-made coziness and eco-friendly decor is only getting stronger. A paper lamp is not just a light source, it's a sculpture, a mood, a meditative project. And most importantly, it's completely safe with the right approach.
⚠️ The most important safety rule: We use ONLY light-emitting diode (LED) light sources: lights, ball lights or integrated LED panels. They do not heat up, which eliminates the risk of fire. Classic incandescent bulbs, even energy-saving ones, are taboo!
Ready to fill your home with the magic of light? Then choose a model!
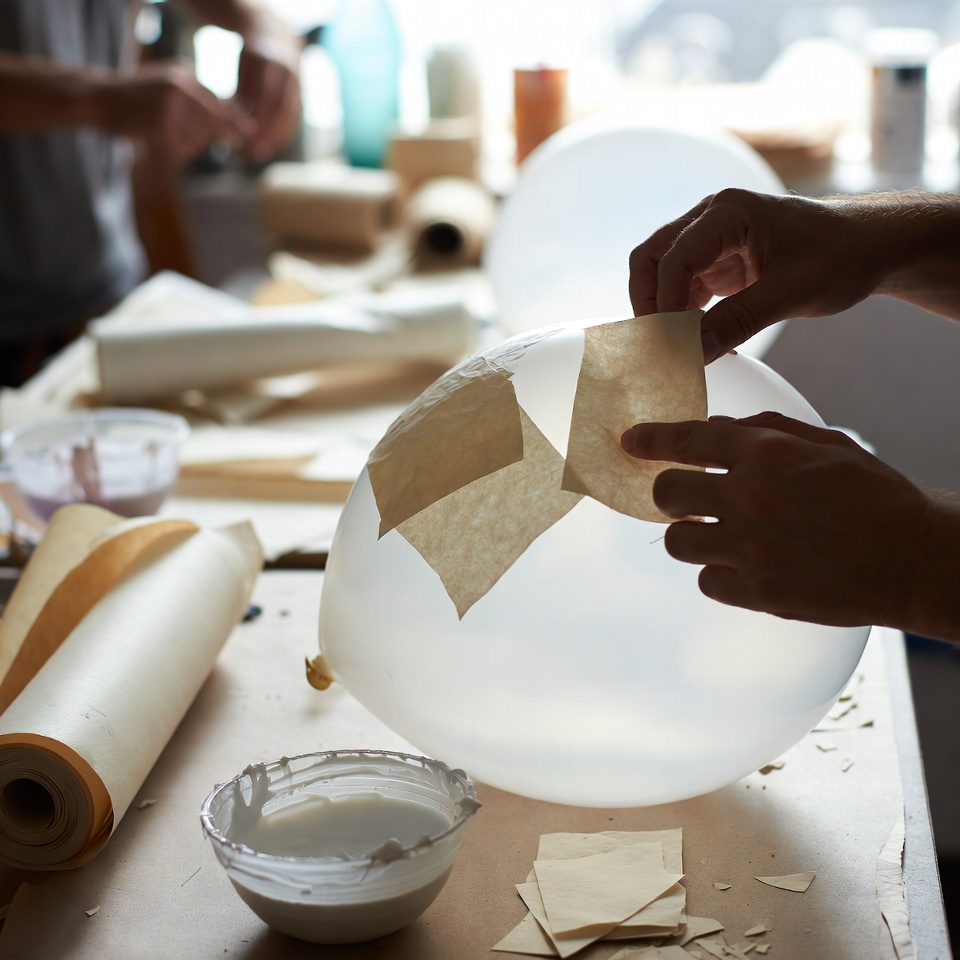
Model 1: Moon ball made of culinary parchment
The ideal model for beginners. Parchment (baking paper) has a wonderful diffusing property, creating a soft, even glow like a full moon. 🌕
You'll need:
- Basis: Balloon.
- Paper: A roll of cooking parchment.
- Glue: Kleister (2 tbsp. flour/starch per 200 ml of water) or diluted PVA (1:1 with water).
- Light fixture: A battery-operated LED garland or a small LED light on a cord.
- Decor (optional): Dried flowers, leaves, knitting threads.
Step-by-step instructions:
- Preparation: Inflate the balloon to the desired size (optimally 20-25 cm in diameter). Place it in a bowl for stability. Tear the parchment into irregularly shaped pieces, not large but not small.
- Sphere Formation: Dip the pieces in glue and glue onto the ball, making an overlap of 1-2 cm. Cover the entire surface, except for a small area around the tail. Make 3-4 layers for durability. Allow to dry for at least 24 hours.
- Final: Burst the balloon and carefully remove it through the hole left. Carefully place the LED lights inside, distributing the lights, or insert a light bulb. You can leave the hole open or make a neat cardboard cover.
Read also: How to make a fall paper lantern?
Lifehack: You can glue dried small leaves (e.g. ferns) or petals between layers of parchment. When the light is on, they will cast magical shadows!
Model 2: Geometric prism made of cardboard and tracing paper
This luminaire is the embodiment of the modern trend for geometry and the play of light. Its strict shapes and clear shadows will create an atmosphere of Scandinavian graphicism in the interior.
You'll need:
- Frame: Dense binding or packing cardboard (2-3 mm).
- Diffuser: Calc or thin white rice paper.
- Tools: Stationery knife, metal ruler, glue gun, breadboard.
- Light fixture: LED panel for embedding in furniture or a long LED tube lamp.
Step-by-step instructions:
- Blueprint: Decide what kind of prism you want to make (for example, a hexagonal prism). On the cardboard with a ruler and a pencil, draw a sweep of the future frame: a long rectangle-base and separately hexagons for the top and bottom. Leave allowances in the side edges of the rectangles for gluing.
- Cutting and assembling the frame: Carefully cut out all the parts with a breadboard knife. Glue the side edges of the frame into a single "wall" and then glue the bottom and lid to it. You will have a sturdy cardboard skeleton.
- Filling in the edges: Cut out pieces of tracing paper to the size of each open face of the prism. Carefully glue them from inside the frame with double-sided tape or a thin strip of glue.
- Installing the lights: Place the LED panel inside by securing it to small cardboard corners, or hang the tube lamp by a wire threaded through holes in the top edge.

Lifehack: On the inner side of the tracing paper you can draw a graphic pattern (dots, lines) using a stencil and a thin marker. When the light is turned on, the pattern will softly show through.
Model 3: Openwork Forest Lantern made of cardboard
This model is a top-of-the-line piece that will impress everyone. Create your own world of shadows and light by carving an entire plot on cardboard. 🌲
You'll need:
- Basis: Very thick cardboard (from a box) and thin decorative cardboard (colored or kraft).
- Tools: Layout knife, self-healing mat, awl or drill with a thin drill bit.
- Diffuser: Parchment or thin paper.
- Light fixture: A battery-operated candle (LED-candle) or a small LED garland.
Step-by-step instructions:
- Thumbnail: On a sheet of thin decorative cardboard, draw the outline of a house, a lantern or a simple box. On its walls, sketch with a pencil: silhouettes of trees, stars, snowflakes, flying birds.
- Jewelry cutting: Fix the cardboard on the mat. With a layout knife, carefully, with light pressure, cut out the drawn elements. This is painstaking but meditative work. Important: Leave sufficient bridging between elements so that the structure does not lose strength.
- Assembling the cabin: Cut out the parts for the body (walls, roof, bottom) from heavy cardboard and glue them together with hot glue. This is the inner frame, which will not be visible.
- Final assembly: Glue your decorative cardboard openwork walls onto the assembled body. On the inside, behind the openwork walls, glue sheets of parchment to diffuse the light. Inside, place a battery-operated candle or carefully arrange a garland.
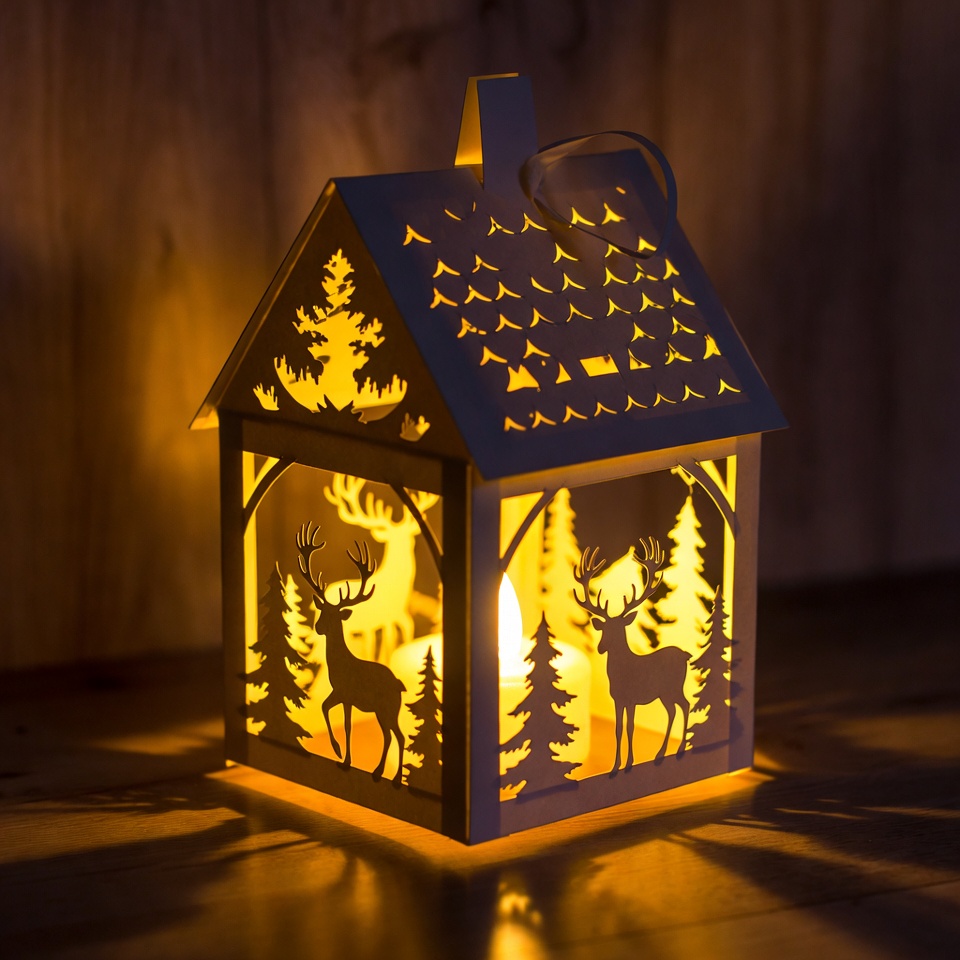
Top safety tip for this model: Always use LED fire imitations. A real candle, even in a jar, poses a risk to the paper product.
💡 Ideas for inspiration and final tips
- Aroma light: Drop a drop of orange, cinnamon or lavender essential oil onto a wooden stick or stone (which you then place inside the lamp next to the LED candle).
- Mobile garland: Make several small moon balls or geometric shapes and hang them at different levels on a branch, creating a light installation.
- Choice of adhesive: For the durability of paper seams in geometric models, Moment Stoljar PVA glue is ideal - it creates a very strong, transparent bond.
Create with pleasure and remember: the right, cool light is the key not only to beauty, but also to peace of mind. Let your author's lamps fill the house with warmth, comfort and a sense of pride in your creation! 🛋️✨


